The Busch 45 project
How to make a new viewing hood
Okay, lets try . I presume, you do have some experiences with screw drivers and perhaps old alarm-clocks.
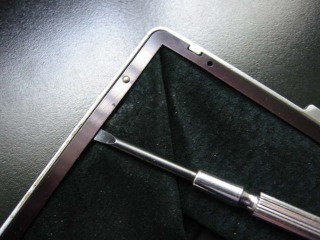
1) How to remove the frame from its rivets:
Start about 1 inch from the rivet and push the screwdriver into the direction of the rivet.
Either the rivet jump out of its position by itself or you may help a bit and turn the screwdriver a little thus forcing the rivet to come loose.
Work with care! Don't force things! Keep your place clean, so that you're be able, to find back again flown away parts.
Secure all the rivets and keep them apart.
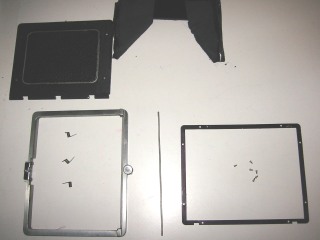
2) Remove frame. Remove the old material and clean everything very carefully.
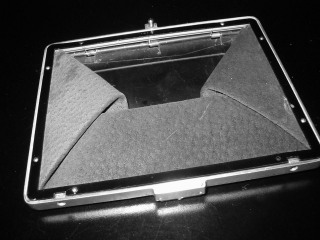
3) The shade
The two rivets on each side on top of the shade and the two strips on the back side keeps the leather on the two sides from the viewing hood straight up when the hood is opened.
I presume that the viewing hood mechanism still works and the shade is kept up by its springs, when unlocked.
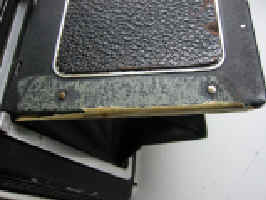
Remove the rivets by knocking them out with a steel nail and a hammer. Make sure the shade lays on a flat solid underlay and where necessary, giving space to the rivet. Knock them out one by one and remove the old leather Remove the two strips on both sides of the shade that used to hold the leather hood.
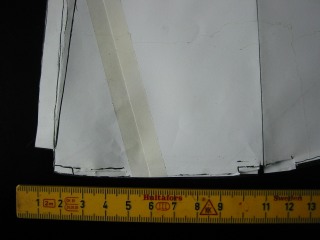
4) Designing the hood:
Since you do not have the original hood, you have to design a new one, fitting to the frame.
You'll need some drawing paper and you'll have to try to make a paper viewing hood as I described on the previous page.
Test the paper viewing hood until you're sure it fits and works.
I can not tell you this procedure step by step, hence you have to experience a little bit. I'm sure that while you're doing the job you'll find the right
way.

Try to find the finest leather to produce the hood. It has to be thin! The thinnest is just thin enough. I bought a piece of leather that came from a leather sports jack!
Now the rest seems simple. Lay the paper pattern on the leather and cut it out carefully. Make the hem or border on the top of the hood by gluing the upper hem and wrap it back to the backside of the leather. The hem should be 1/2 cm.
Play around with the new leather hood, the frame and the shade to find the right position. Try to open and close it keeping it between your fingers or use temporary fasteners like tape. The hood will find it's own position, so do not worry about holding the crease.
Now you're pretty sure it is going to work, attach the leather to the frame.
Replace the rivets and knock them into their place. You may use some glue to make sure they will stay there.
If the rivets from the shade survived your action, they can be used again. Prepare the holes in the leather and place the rivets. Make sure the underlay is solid iron and clinch the rivet with a very small hammer. Before doing this, glue the leather to the back of the shade and replace the strips.
There is something else;
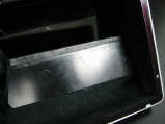
To keep the leather viewing hood straight, you'll need a strip of plastic and glue it to the inside from the hood, opposite to the shade as shown on the picture. The 9 cm side on top next to the hem and the 11 cm side downwards.
This (11 cm) side forces the hood to hold the crease.
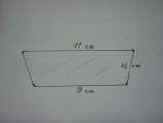
11 cm top long 9 cm bottom 3 1/3 cm high 1 mm thick
Restoring Busch Advertisement Busch Model D Pressman Pressman Model D Features.
The Busch 45 project Manual Vue Focus Rangefinder The viewing hood workout