

There are as much as 10 possibilities and impossibilities
fitting film holders on different kind of camera backs..
This page shows you the available film or plate holders for each of the camera types.
About the complicated nomenclature
of Graflex backs and film holders. First of all we'll concentrate on the Graflok Back The fist photo shows the
upper side of the Graflok back. The Graflok back was the first international
standard back for 4x5 inch cameras. This means that you can remove the complete
focusing panel including ground glass and focusing hood permitting the
attachment of the Roll Film Holder in the locking mechanism of the camera. For
shooting with the normal 4x5 film holder the Graflok back is superfluous and the
Spring Back would be sufficient. The older Pacemaker -Speed or Crown-
with the side mounted Kalart Rangefinder can be equiped with either of these,
though the Anniversary is always equipped with a Spring Back. The
Top Mounted Pacemaker Speed or Crown camera
is always equipped with a Graflok Back. Summarizing: if you don't
intend to use a roll film back, a Spring Back would do. The advantage of a Film
Holder is that the 4x5 negative gives a much more better result than the 22" or
23 "negatives of a Roll Film Holder. No doubt about that. The photo below shows
the sliding lock mechanism and the click-in snap on Graflok spring. The spring loaded focusing panel frame
pulls back to accept all Graphic sheet film holders including the
Grafmatic
and is instantly removable to permit the attachment of the Graphic Roll Film
Holder by means of the Graflok slide locks.
The Pacemaker as well as the Anniversary cameras accept only
attachments with the raised rib light trap like the photo below Graphic Raised Rib light trap. Also available in 2x3 and 3x4
inch negative format. Now we'll take a look at the Spring Back
The size of the Spring Back is the same as the
one of the Crown or Pacemaker Graflok back. The older pre war Graflex cameras are often
equiped with the Graflex Back.
The Graflex Back accepts only Graflex
plate or film
holders and Graflex Roll Film Holders. The revolving back can be turned around when pushing chrome
knob at the same time.. Attention,
Suitable holders for Anniversary and Pacemaker Speed (Crown)
Graphic.
fig. 10
fig. 11 Holder # 1 Plate holder
for 4x5 camera. Note the spring in the middle. Holder # 2 Sheet film holder
only for 9x12 cm film. fig. 11. Not suitable for 4x5
sheet film. Holder # 3 The one and only 4x5
inch sheet film holder. Brands are Riteway, Fidelity, Graphic, Lisco. Always check the film size which is mostly printed on top of
the holder. Note: 9x12 cm is not the same as 4x5 inch! All these
holders for use with Graflex Pacemaker cameras should have a raised lock rib light trap.
On the left picture the modern Riteway Fidelity Holder and on
the right Pacemaker camera equiped with the desirable Graflok back. Loading Sheet Film Holder.
Sacrifice one sheet of film
for practicing purposes. The box containing sheet film is interleaved with a sheet of black
paper between two film sheets. You may
practice this a couple of times with a used negative film in day light, to get the
right feeling.
The 4x5 sized 9x12 film holder. At the first glance the holder
looks like the 4x5 holder. However Right: 9x12 film compatible to the (4x5) sized 9x12
holder and fits into the grooves.
Left: Glass plate holder. Very Important! It is important to know that not all film holders are of the
same depth. That means that the film position in relation to the lens may
differ up to 0,5 mm. Also the thickness of the film could be a reason for minimal
blur. Stopping down would be the solution for better results. Always use the same Brand and type of film holder such as
Riteway, Graflex, Fidility, Linhof or Lisco. Preferable are the newer plastic holders rather than the older
wooden ones.
RH/8 Cat. No. 1255
for 8 exposures 2 ¼ x
3 ¼ 6x9 per roll of 120 film.
RH/10 Cat. No. 1256
for 10 exposures 2 ¼ x 2 ¾ 6x7
per roll of 120 film.
RH/12 Cat. No. 1257
for 12 exposures 2 ¼ x 2 ¼ 6x6
per roll of 120 film.
RH/20 Cat No.
12..
for 20 exposures 2 ¼ x 2 ¾ 6x7 per roll of 220 film.
The newer Rapid Vance Graflex Roll Holder. Graflex name
on cover. Graphic name on backside. These types of Roll Holders are compatible with the
Pacemaker Speed and Crown Graphic Graflok backs. Confusing is the name Graphic on the back and Graflex on the
front of the roll film holder. To define the Graflex and Graphic Roll Film Holder you may
look at the inscription on the back. It reads Graphic or Graflex. The Graflex
Holder is the one with one groove on top of the backside and the Graphic is the
one with the two ridges on top. The Graflex Roll Holder is not compatible with a
Graflok or Spring back. It only works with a Graflex Back Camera. The most
popular Graflex Back cameras are the Graflex Revolving Back 4X5 and the Graflex
Super D. The housing of the Roll Holder is marked as Graflex or Graphic. The
Graflex Roll Holders are for 8 exposures on 120 Film. To make the confusion
complete, Singer
named the roll holder Graflex again. This in spite of the fact that these roll
holders were made to fit to the Graphic cameras. They are however easy to
distinguish as they are equipped with an advance lever with the +g logo
on the lever. These +g marked Roll film Holders such as the - RH 10
and RH 8 can be used with the 120 and 220 size roll film and can be mounted on
the, with the Graflok equipped, Pacemaker Speed and Crown. #10 Mask for Graflex Pacemaker Crown and Speed Graphics. This
corresponds to 86-90mm for with an RH-10; 83-98mm with an RH-8; 122-133mm for
34" and 150-162mm for 45".
The Graflex knob wind film
holder with groove for use with cameras equipped with the Graflex GG Back.
The "22" Graphic
Roll Holder to fit to a 4 x 5 inch Pacemaker Crown or Speed Graphic equipped
with the international Graflok back.
"22" Means 12
exposures. Each 2 x 2 inch. 5,7 x 5,7 cm on 120 roll-film. "23" means
2x3 inch - 8 exposures
6x9 cm.
Roll holders are also
available for 2 ¼ x 3 ¼ and 3 ¼ x 4 ¼ on 120 roll-film in knob as well as rapid
advance lever. The Graflok back accepts
only Graphic attachments with the raised lock rib light trap.
The spring loaded focusing
panel frame pulls back to accept all Graphic sheet film holders and is instantly
removable to permit the attachment of the Graphic roll film holder.
Roll Film Holder.
To fit to the Graflok back
a Graphic Holder is required. To remove the Graflok focusing panel, press in on
the two arms to unhook them and slide the panel to the right and off. Fit the
Roll Holder to the back of the camera and hold in place by means of the upper
and lower slide locks. The Graflex Roll Holder can be fitted directly to the
Graflex Back and held in place by means of the slide locks.
Place the holder face down with the Dark Slide up to the
right. Press the release latches together and lift open the cover.
Load the full spool into the left hand compartment with the
slot in the end of the spool down. Tip the edge of the spool into the cavity in the lower side
of the roll holder carriage and press it downward against the spring as far as
possible until the spool can be tipped forward into position. Hold lever A to the left and turn the winding knob until the
last number (8 or 12) on the counter passes the index
mark (B white line) and the
counter no more turns. Break the seal of the roll film and unwind enough of
the protective paper covering of the film , making sure that black side is
outward, to pass around the front of the carriage and around C
the take up spool with the winding knob until the arrow on the paper is
opposite the arrow on the carriage. So the paper should be underneath
the wind up spool. You may use an inch of some 3M or Tesa Film to
ensure that the paper stays fixed to the wind up spool. Now turn the exposure counter to "S" by
turning the domed indicator in the direction of the arrow until it snaps into
place and cannot be turned further. If it is necessary to anchor the paper
backing of the film more securely onto the take up spool before the cover is
closed the winding knob may then be turned but not more than one turn before
the cover is closed to prevent fogging the film. Return the film compartment to the holder and close the
cover. Turn the winding knob in the direction of the arrow until it stops
automatically on the figure 1 indicating that the film is in position for
making the fist exposure. For the next picture move the lever A
to the left and release and turn the winding knob until the
lock re- engages indicating that the film is in position for the next picture.
After the last exposure move lever A to the left and release. The knob will
turn freely permitting the roll to be completely wind through.
Here are some
useful tips to start, but first of all we have to study the complicated
nomenclature of Graflex backs
and the right plate or film holders to prevent
purchasing the wrong camera or the wrong holder.Complicated Graflex
Nomenclature
Graflok, Graphic and Graflex Back.
Your camera may be fitted with any of three different backs,
the Graflok Back (yes, Graflok with K not ck), the Graphic Back , or Graflex
Back. All of these backs allow ground glass focusing through the
focusing panel
at the back of the camera. This is the only type of focusing that permits
simultaneous checking of the composition, sharpness and depth of field exactly
as it will be reproduced on the film.
The international GRAFLOK back

showing the back side of the
4x5 - 22" roll
film holder.
4x5 is the size of the board fitting to the back of your Graflex Pacemakers
Speed or Crown.
22" is the film negative format of the Roll Film holder.


The Graphic Back also called Spring Back accepts
only Graphic film Holders which have the raised lock rib light trap construction
and which can slide into the focusing back beneath the focusing panel. Specific instructions
for removal of the focusing panel for attaching bigger accessories such as the
roll film holder can be found
here.
The Graphic Back or Spring Back has a top and bottom central fixed spring that
holds the focusing panel firmly on its place and will give space to insert the
4x5 Double Dark Slide Film Holder between the focusing back of the camera and
the spring loaded focusing panel.
Please take in mind that DUE TO THE NOT REMOVABLE SPRING BACK THIS
EQUIPMENT DOES NOT ACCEPT ROLL FILM HOLDERS.
It does accept the Grafmatic holder, but it is advisable to loosen both screws
holding the spring back to reduce the spring tension.
Remove the Grafmatic after shooting as soon as possible to avoid the blade
springs getting "lazy".

All Graflex attachments have light trap
slots cut into the flat sides of the holder at the handle end as shown below.
Graflex Plate Holders Pat. 2056144
There is however one important thing to know when attaching the film holder to
the revolving back:
Always keep the low light trap (photo on the left) on the right side of the
revolving back.
Both light traps looks the same but they differ in height. If necessary turn
holder with the lowest side on the right!

Lower light trap should be placed on the right side of camera back. On the left photo the Graflex
revolving back.
The revolving back can be set on Portrait or Landscape mode.
Note two slide
locks and light trap on the right side (arrow).
On the right photo you see the Graflex double film holder with grooves along both sides.
The top of the holder fits the uprising trap of the revolving back.
The above Graflex sheet film holders were also available as GLASS PLATE HOLDERS.
They could be used with sheet film as well -however- only with the help of
special available inlay sheet-film eptums.


The plate holder is a bit thicker
that the film holder but that is compensated by the depth of the inside.
It
offers more space to install a 2 mm thick glass plate.
If you don't
intend to work with glass plates, forget this holder and continue.
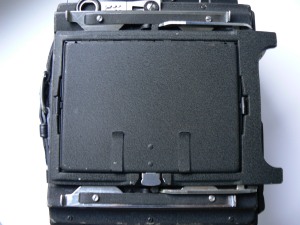
The last is the ultimate combination
for guarantied swift and secure work.
The well chosen materials and good design
made it to the most used professional sheet film equipment.

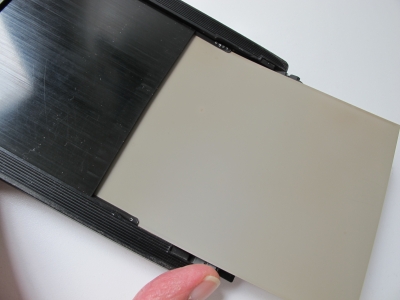

Each sheet of film is provided with an
identification notch on one corner.
When the notch appears and can be felt along
the top edge at the upper right hand corner or on the left bottom side, you may
slide the sheet film into the holder, the film emulsion is now faced to the
lens.
Before sliding the film into the holder you have to flip up the hinged
slot on the bottom of the holder as shown on photos.
Be sure to get the right film holder. Next photos will guide you
to make the right choice.
Slide dark slide some inches to open the holder.
Flip
up the hinged slot on the bottom and slide a sheet film with the notches
positioned on the top right side into and between the slotted grooves inside.
Close the hinged slot and
slide the dark slide back to close the holder. 

a sign on top of the film holder tells us that this is a 9x12
cm film holder. A 4x5 sheet film would not fit into this holder.
Left: note the film guide. The 4x5 inch film does not fit in
the outer grooves. 

|Sheet Film is not compatible to the Plate
holder.
Note the spring in the middle. Its purpose is to press the glass negative
against the frame.
The 4x5 Sheet
film holder.
Right. This is the holder you are looking for. Double rail guides for easy film
loading.
Note: notches on the right hand corner. This way it should be placed to face the emulsion to the lens.


120 - Roll Film Holder
The
new Rapid Vance Roll Holder have extra guide rollers to hold this thinner film
pressed against the film gate.
Graflex Rapid Vance holders for 4x5 inch are:


To make it a bit more complicated there
was another type of sheet film holder,
the Film Pack adapter.
As loading and using the film pack was very uncomplicated film packs were
very popular.
The holder is a box equiped with a dark slide. The hinged back opens on one side and
the whole pack can be dropped into the adapter.
After unsealing the paper tabs are good visible and easy to draw out at the top front
side which forces the first or next film to replace the former exposed film.
Now the new unexposed film film was placed in front of the holder, directly
behind the dark slide and ready to be exposed.
Unfortunately Film Packs are no more available.
There is however a possibility to take photos using this holder.
No adjustments would be necessary inside the holder to make it suitable for use with
sheet film.
Just a block of wood or plastic big enough to fill the empty space inside the
holder.
This block will exhibit the light entering inside the holder and thus fogging
the film.
Lay one unexposed sheet film with the light sensitive side to the frame inside the holder.
Notches on the right upper corner or the left lower side makes sure the film
has been placed correctly.
Place the block on top of the film and close the top cover.
Its easy as that!
Each advantage has its disadvantage and it has to be said that this solution has
the disadvantage that you only can take one
exposure at the time before changing the sheet film. That means that you would
need to have a portable darkroom with you to change the film.
The next solution would be more convenient regarding changing the use of
available 120 roll film rather than sheet film.
To learn more skip to the 3/14 x 5 1/2 Roll film holder.
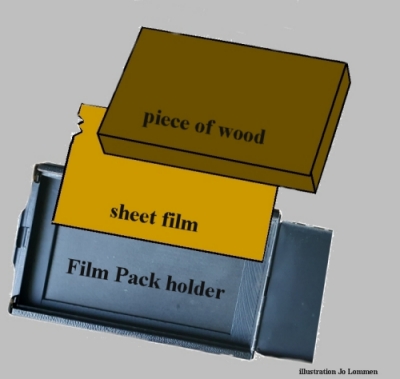
It would be nice if you could cover the block with some black velvet to avoid
scratches on the film back.
You'd only need a dark room or a changing back to load the holder with film
Place the holder against the camera back and start the
exposing procedure not forgetting to draw the dark slide.


On the left a (Zeiss
Ideal 225) 9x12 cm holder loaded with an Isopan Film Pack. (This holder does
not fit any of the Graflex cameras)
The photo on the right shows an empty original Kodak 3 A Film Pack adapter which
fits to the back of the Graflex 3 A, 1 A and Compact Graflex Camera.
However no Film Pack is available and you would have to improvise. One 4x5 sheet
film would do.
I imagine that a good fitting wooden or plastic block would be perfect to keep
the sheet film
tight to the holder's inside film frame.
The appropriate film can be cut down from 4x5 inch to 3 1/4 x 5 "
In that case the open holder-frame length has to be resized to 5 inch by using a
1/2 "high card board strip .
To use the whole original exposure frame a 5x7" film should be cut down to 3 1/4
x 5 1/2 to fit in this holder.
The 4x5 inch Film Pack Adapter


The Graflex/Graphic nomenclature is a bit
difficult.
Note the difference: on the left
GRAFLEX
and
on the right the
GRAPHIC
film Pack Holder.
The Graflex fits the Super D among other pre war Graflex cameras
Note the notches on the GRAFLEX which is essential for fitting the oldies..
The GRAPHIC fits to the Anniversary Speed Graphic as well as the Pacemaker Speed Graphic.
If you happen to have the classic Roll Roller
Than here is another more easy alternative
.

You can order the 152 to 120 Film Spool Adapter Set/Kit
4 pieces Kodak/Graflex Roll Holders #52 5 1/2 x 3 1/4 adapters.
Remove wooden rollers and replace them for the normal 120 film rollers
and ad these special adapters.
plenty available on eBay
620 Roll Film Holder
adapt- a-roll


The Adapt a Roll 620 is
made for the 620 Roll film, which is unfortunately not available any more.
The
Adapt-a-roll 620 was designed to take pictures without loosing time changing
film-sheet-holders.
Advancing the film by turning the knob is far more easy
than pulling out the film holder turn around and replacing.
not to forget the essential job to push back before removing or pull out the dark slide
before taking the next photo.
On the other hand it must
be said, that to advance the film in the 'Adapt-a-roll 620' takes also time
and it does not stop automatically after advancing one frame.
"How to load the Adapt-a-roll 620".
The Cut Film Magazine is more or less just a collectors item rather than a usable film magazine. However you can use this device without any problem with the 4x5 sheet film. As these are very old leather backs, you better check them for pinholes by putting a electronic flash into the leather bag. Fire the flash in a dark room.
The
double dark box consist out of two parts. One of them is the dark-box made out
of metal and the other is a leather bag . The film-holders can be moved from
the metal box into the leather bag after
exposing and back again without coming into daylight.
The dark box contains 12 film-holders called septums. After the exposure, pull out the sliding-lid on the side. The sliding-lid will take the septum or holder with the exposed sheet film out of its first position opposite the lens into the leather bag. Now, by the feel, you can push back the septum into the dark-box, but now at the back. Now the next septum automatically has been moved in first position and is ready to be exposed. As the holders are numbered on the back, you can check the exposed number by lifting up the little hinged door of the “dark film holder”.

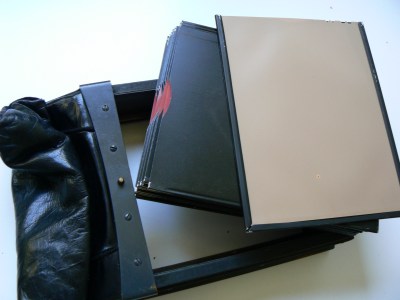
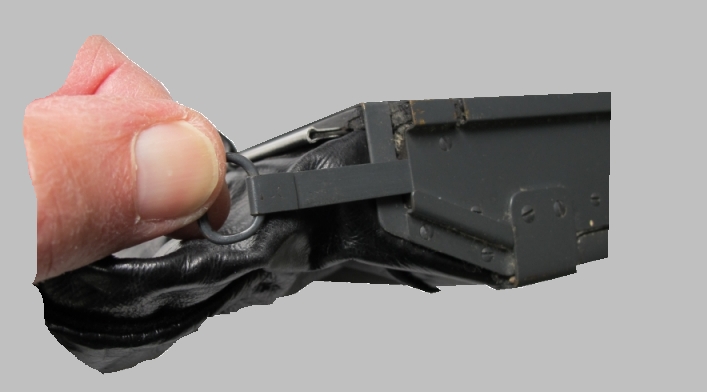
The exciting movement: drawing the exposed sheet film into the bag using the
sliding rod
Next step is to relocate the sheet at the back of the line.
Then sliding the steel septum back into the holder. All this has to be done by
the feeling outside the leather bag.
There is an original manual for more details.
Instruction
for use the Graflex Cut Film Magzine
The Grafmatic holds six sheet films, yet is scarcely thicker* than an ordinary two sheet film holder. It allows fast action for rapid picture taking or sequence shots. Film changing with the Grafmatic is lightning fast. Simply pull out the handle and push back into place. Your next film is positioned for exposure, in the same movement your previous film is transported in the back of the holder, perfectly protected against double exposure. An automatic exposure counter does the bookkeeping and stops all cooperation once the "X "on the counter has been reached. Loading the septums in full darkness need some practice but is quite easy. Large identification notches makes it easy to identify and load. The Grafmatic is easy to use together with the Graflok back.
* The Grafmatic is 12 mm thicker than the regular double sheet-film holder. For use with the spring-back you might consider to mount thicker washers beneath the two springs. Note: The distance of the film surface to the outer frame of the holder is 4,5 mm which is the same as the regular sheet-film holder.


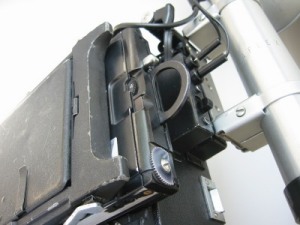
On the left: The Grafmatic Film holder is backpacked on the
back of the Graflok equipped camera. On the right photo you can see how the
Grafmatic is sandwiched between the Graflok back and the Ground glass focusing
device. Both methods are possible.
When the Grafmatic has been placed between the focusing panel and the camera
back you'd better lock the Grafmatic holder with both slide locks, to prevent
unintentional lifting and thus blurring the film when the dark slide has been
drawn.


For more info about this great device
The Grafmatic chamber accommodates 6 metal sheaths or septums. Each septum contains a sheet film. After exposing, the slide has to be drawn out of the housing and pushed back again. Now the next film is automatically positioned in front of the holder, waiting for exposure. Note the groove on the left picture allowing to use this 23"Grafmatic with the Graflex as well as with the Graphic backs. Both the 23 and the bigger 4x5 Grafmatic was available for the Super D and the later Pacemaker Crown or Speed Graphic cameras. The difference is the groove that fits the earlier Super D and the two ridges fitting to the Pacemaker Crown and Speed.
This is, by far, the easiest way to carry around sheet film for your 4x5 camera. It fits standard graphic backs (locking type) as well as most spring-loaded backs. Its only about 1.25 the thickness of a double-sided back and holds three times as many sheets of film! The mechanism sequentially releases the dark slide (built-in, so you can't loose it) and cycles a sheet of film forward. By pulling out the handle and pushing it back again, the exposed sheet of film is cycled to the rear of the pack and you're ready to shoot the next picture.