care must be taken to avoid accidental removal of the holder during operation.
Only the Graflok back is recommended for use with the Grafmatic

The 4x5 GRAPHIC Grafmatic holder is not recommended for use with GRAPHIC
Backs-but if used,
care must be taken to avoid accidental removal of the holder during
operation.
Only the Graflok back is recommended for use with the Grafmatic
Clever film exposure counting mechanism
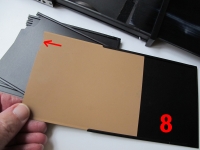
prevents double exposure and blanks.
Preparing First step
Mounting the Grafmatic to your camera.
The Grafmatic film holder is an
automatic magazine holding six individual sheets of film.
Besides indicating the exposure number,
it has an indicator which tells you whether the film is in the exposed position
and if covered by the dark slide.
The safety system prevents double exposures and blanks.
The 4x5 Grafmatic holder has an automatic
film sheet numbering system, which exposes the number on each negative.
The Grafmatic Film Holder is compatible
with the Pacemaker Speed and Crown Graphic cameras equipped with
the Graflok back.
The Grafmatic does not fit to the back of the Graflex Anniversary Speed.
My personal preference:
It is much safer and more practical to
unclip the Graflok back from your camera.
Store the Graflok back on a safe place and instead mount the Grafmatic Holder directly to the camera back,
rather than sliding it
between camera back and the Graflok back.
The reason is that the Grafmatic is much thicker than the normal double D
sheet film holder.
The spring might get weaker if under tension too long.
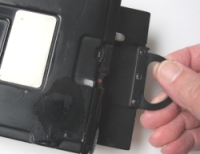
Mount the Grafmatic device by using the camera slide locks as shown on the
photo below.
Both the upper and lower slide locks fit perfectly on the Grafmatic slots.
Another advantage is the fact that the connection between camera and holder is
intensively solid and not vulnerable for bumps which can lead to a blurred film.
Check thoroughly if the slide locks are
all the way inside the side grooves of the Grafmatic.
From now on the Grafmatic is the finest and fastest working sheet film
holder of all other!

Using it with the SPEED or CROWN GRAPHIC Camera.
The Grafmatic is
extremely simple to operate.
But make sure
that you keep one of both shutters open
if in use with the SPEED Graphic!
Unlike
the Crown, the Speed Graphic is equiped with a Front and a Focal Plane shutter.
Decide
which one you are preferable going to use and make sure the other shutter is all
the time in
open position.
Barrel lenses without their own shutter always demands the use of the Focal Plane
shutter, so in that case convince yourself
that the front shutter is "open"
And now how to operate the Grafmatic.
First acquaintance
with the 4x5 inch*sheet film Grafmatic.
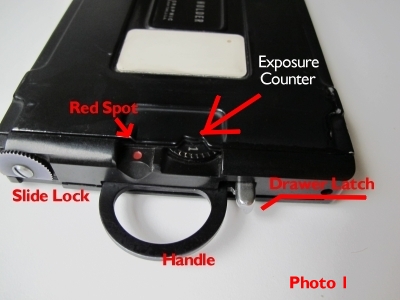
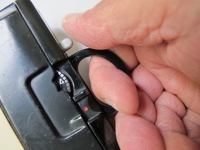
The Slide Lock
enables or disables the use of the dark-slide handle.
The dark-slide handle for use with or without the
"draw-latch"
The film exposure counter
Red spot shows whether the next exposure can be made.
Drawer Latch to pull and push the film sheet
compartment.
A great advantage is the
automatic numbering of your negatives.
Now PULL the slide all of the way out and PUSH it all of the way back, before shooting.
The first film will spring upward and be locked in the exposed position and the red dot at the back of the holder will be un covered indicating that a film is in position ready for exposure. After exposure the first film must be moved out of the way. To do this, press down with your thumb on the chrome latch, holding it against the slide handle, and PUll the entire film compartment all of the way out. Release the latch and PUSH the entire compartment in with the handle. When it is all of the way in, the exposure counter dial will move to No.2 and the red dot will be covered indicating that the film is covered and the holder can then be removed from the camera. The same sequence is followed for all six exposures. After which an "X" will show on the exposure counter dial and the slide will be locked into the compartment indicating that you have made six exposures. NOTE: The films will be fogged if the film compartment is opened when the holder is not in the camera. To prevent accidental opening be sure the counter dial is set at a numbered position. Wtih the 4 x 5 Grafmatic this is not necessary since the drawer and slide locks automatically when the "X" on the' exposure counter dial is visible. (Drawer does not lock on early models.) To 2 release the slide for recycling or loading, turn the dial to No
Exercise...
If you already coupled the Grafmatic to the camera remove
it.
We are
going to exercise without camera or film.
Open the compartment by pulling out the drawer together with the chrome latch.
The compartment comes out completely.
The compartment is still closed.
Draw the dark slide out and all the 6 septums will pop up with the closed end in
front.
Grab them in one move all together and pull them out of the compartment.
Loading the sheet film in the septums
No need to tell you that this must be done in total
darkness, if loading real unexposed film sheet.
However, practise should be done with useless sheet film and in full light.
Concentrate on the notch codes on the upper side of the sheet film. The so
called indentation code.
After practising get used to work this out with eyes closed and later by the
feeling in complete darkness.
TOOWTDI
There is only one way to do it
Film sheets must be slide into the septums with the notch code* in the
upper right corner.
All loaded septums must be placed together in the compartment exactly
as follows:
If not done already, empty the holder from septums
1)Pull dark slide drawer together with latch
2) Pull dark slide
3) Grab all 6 septums
Now
loading the septums with sheet film in total
darkness
4) Provide every septum with one sheet of film.
5 Slide the septums one by one against the pressure of the spring into the
compartment and keep them
under light pressure in such a way that they don't pop up outside the
compartment.
6) If all septums found their place, slide the dark slide back to cover the
septums.
7) slide the compartment back into the Grafmatic housing.
The Grafmatic is loaded and can be placed in the light again.
After Loading with film
Set
the exposure counter on 0.
Set the knurled
slide lock wheel in the open position permitting the dark slide to be pulled out
with the drawer.
Just two
movements are required: PULL and PUSH.
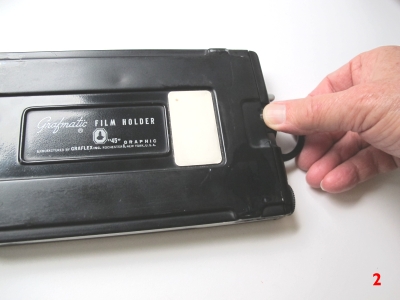
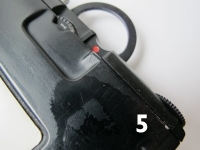
Photo 2
First check to see that the exposure counter dial at the back is
turned in such a way that figure "1"
appears.
The chrome drawer latch should be in free position.
If the drawer
latch does not jumps back in position you may push the dark slide handle firmly
back in home position.
The chrome latch will jump back in position.
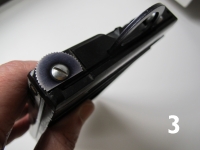
Photo 3
shows the knurled slide lock wheel in open position.
next unnumbered photos show how to push the chrome latch and draw the darks
slide.
Now
PULL the dark slide by the handle aIl the way out
Photo 5 and PUSH it all
the way back again, the first septum is in position.
Note:
Do not pull the dark slide while holding the chrome latch against the handle.
It
would draw the film compartment out of the holder and fog the negatives inside.
The
red dot at the right side of the holder will be uncovered indicating that a film
is in position ready for exposure.
After
exposure the first film sheet must be moved out of the way.
To
do this, press down with your thumb on the chrome latch, holding it against the
slide handle, and PULL the entire film compartment all of the way out.
Next
release the latch and PUSH the entire compartment back in the holder.
When it is
all of the way in, the exposure counter dial will move to No. 2 and the red dot
will be covered indicating
that the film is covered and the Grafmatic holder
could be removed from the camera if necessary.
If
continuing taking photos, the dark-slide should be drawn and pushed back again,
which would bring negative number 2 in position.
The
red dot is visible which means that the camera is ready to shoot.
The
same sequence is followed for all six exposures after which an "X"
will show on the exposure counter dial and the slide will be locked into the
compartment indicating that you have made six exposures.
Now
you can remove the Grafmatic holder from the camera and carry it to the
darkroom.
To
prevent accidental opening turn the knurled wheel in locked position.
To
release the slide for recycling or loading, turn the dial to Number I.


To load the Grafmatic film holder.
To exercise use at least one sheet film.
Set the indicator
dial on a number Photo 5, press the chrome latch toward the handle Photo
6 and pull the film compartment out.
Hold the compartment in this extended
position and PUSH the slide handle in until it releases the chrome latch, then
PULL the slide out.
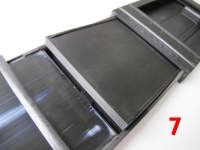
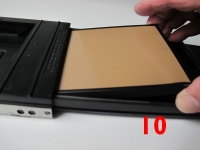
The Film septums have springs under them and will pop up. Photo
7.
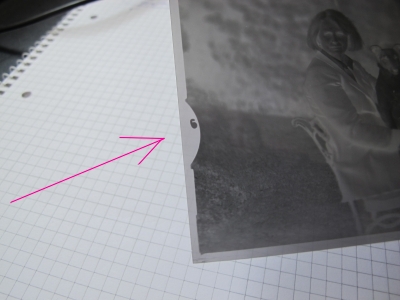
When loading the septums, keep the film notch over the notch at the open
edge of the septum Photo 8.
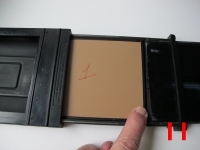
Before putting the septums back into the
compartment, be sure that the sliding plate, by the felt strip, has been pushed
back out of the way, into the end of the film compartment Photo 9.
Hold
the loaded septums by the edges and with the notched end opposite the slide
handle, place them down
into the compartment with the edges of the fingers on
the septum rails Photo 10.
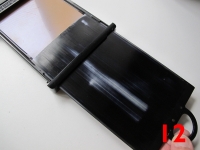
Still holding the two compartments apart as
far as possible press the septums down Photo 11while
pushing the
dark-slide all of the way into the film compartment Photo 12
which may
then be pushed into the rest of the holder until it locks Set the counter dial
on No. 1 and you are ready to start shooting.
The
4x5 Grafmatic has 4 additional features made
possible by its larger size.
These features are the automatic negative numbering
wheel located at the handle end of
the picture opening the 3 position slide lock wheel,
the white
memo tab on the back of the holder, and the holder identifier
tab recesses.
1.
The automatic negative numbering wheel numbers each film to correspond with the
number appearing on the exposure dial at the rear of the holder.
2.
The knurled slide lock wheel on the end of the holder has three positions.
When
this is turned so the red dot shows, it indicates that the holder is loaded and
not exposed.
The intermediate locked position of this wheel can be Used to
indicate that the holder is loaded, and the film has been exposed.
The unlocked
position allows the slide to be pulled out.
3.
On the back is a white plastic area upon which identifying data can be written
For temporary data use pencil or crayon, for permanent data, use ink.
4
Recesses for locating identifying tabs are found at the extreme right and left
of the negative numbering wheel
GRAFLEX acetate ink or India ink can be used to
write on these tabs Cut the tab from a sheet of clear acetate or cleared piece
of film
and fasten in place with a small drop of household cellulose acetate
cement
Suggestions and Tips
You
may find it necessary to remove the Grafmatic from the camera without exposing
the film which has been shifted to the exposure position.
Simply pull the
compartment out as though the film had been exposed and likewise shift the other
five septums which will bring that film again to the top, but not in the
exposure location.
At the "X" or arrow setting flip the dial to No. 1
with the edge of the thumb and continue to recycle.
This operation can also be
done after the other septums have all been exposed, but in any event the
Grafmatic holder must be in the camera when the septums are being shifted.
When
pulling the slide or film compartment, pull straight outward—not backward—to
avoid
leverage pressure against the focusing panel or slide locks with attendant
danger of light leak.
When
the holder is open for loading, note that slight pressure on the button on the
underside of the film compartment will release the automatic exposure counter
control slide.
If the holder is laid on a flat bench, no difficulty will be
encountered.
Otherwise, it will be necessary to check to make sure that this
slide does not extend into the septum chamber before attempting to insert the
septums. See Fig. 5.
When
loading septums into the film compartment, use the thumb and finger holding them
to act as a channel guiding the septums down into place.
All
six septums must be in the compartment in order to operate the counting
mechanism.
Because
of the compact and light-tight design, as well as the movable dark slide feature
of the Grafmatic film holder,
some care should be exercised in storing or
carrying it, to prevent foreign particles from becoming lodged in the front or
face of the holder around the edges of the dark slide.
It is suggested that the
empty holder be blown out occasionally.
When
the Grafmatic holder is used in a Graflok Back, slide it under the focusing
panel and be sure to lock it in place with the slide locks.
If the Grafmatic
holder is used in a 21/4 x 31/4 GRAPHIC Back, an additional set of spacer
washers may be required
beneath the focusing panel springs at the point of
attachment to the camera to allow easier insertion of the holder.
Since Graphic
Backs do not lock the Grafmatic in place, be careful not to pull the holder out
during the cycling operation.
* The 2x3
inch Grafmatic magazine is not equiped with a knurled slide lock but instead
with a hook.
* Indentations on the edge of sheet film to allow photographer to
identify film brand and determine the emulsion side
If emulsion is on the wrong side you wont get a negative!
