

The 1940 - 1946 "Anniversary Speed Graphic" was, as the name indicates, the successor of previous launched "speeds" from the early twenties to the late thirties and forerunner of the new generation after-war developped Pacemaker Speed Graphics.
These earlier "Speeds" are listed down here.
This early "Speed Graphic" also known as the "Top Handle" Speed Graphic was available in
3 1/4 x4 1/4 the 4x5 and 5 x 7 inch. format.
Where the common front shutters at that time were no faster that 1/400 sec. all these new Graflex cameras were marketed as a compact folding camera equipped with a fast, up to 1/1000 sec. focal plane shutter,
Reason why these cameras were named "Speed"
In the Graflex family this was, apart from the cycle Graphic s and the number "0" Graphic, the first no-reflex camera.
Instead these cameras had a cross hair optical view finder on top of the housing, later replaced by a tubular rangefinder.
The cameras were equipped with a spring back to receive Graphic plate or film holders.
These holders must be placed between the camera-house back and a ground-glass spring back.
The spring back was not removable, while the Graflex back could be taken off to be exchanged by the glass of film holder.
A slide lock on the back frame upper side kept the glass or film holder light tight to the camera.
The five slit curtain featured speeds up to 1/10 to 1/1000 sec and "T"
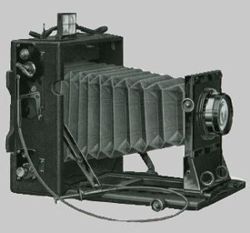
1) Speed Graphic "Top Handle" 1912-1927
Only the spring back on 4x5 inch format and only barrel lenses were provided.
The 3 1/4 x 5 1/2 or Postcard Format available with spring back or Graphic back.
Tapered bellows.
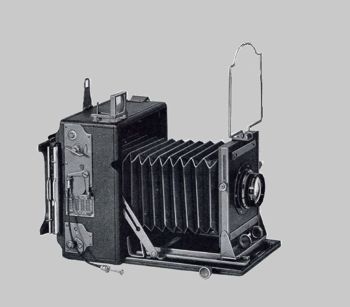
2) 4x5 Pre-Anniversary 1928-1939
To distinguish this name was given after several years
after its introduction.
Strait bellows. Frame finder on top of lens standard.
Strap carrying holder on the side.
more advantages during its life time. Horizontal Graphic or Graflex back.
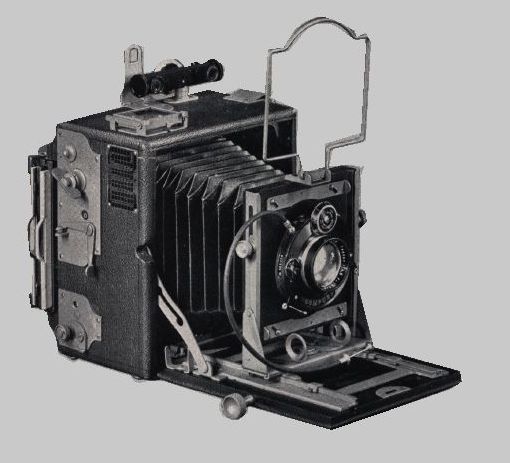
3) 3 1/4 x 4 1/4 Pre Anniversary 1935-1939
An economical smaller film size to compete with British standards.
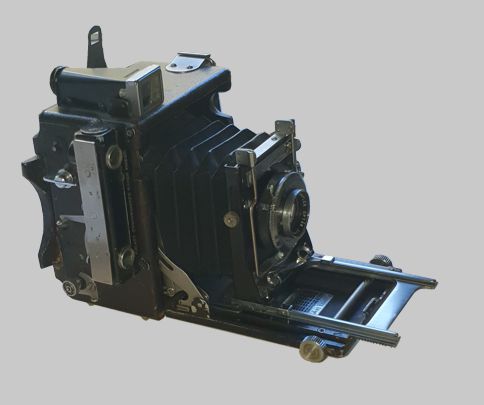
4) 5x7 inch Speed Graphic 1932-1941
Graphic or Graflex back.
As from the late thirties, the Kalart rangefinder was an option.
The 4x5
Anniversary Speed Graphic
1940-1946
most popular with press and professional
photographers.
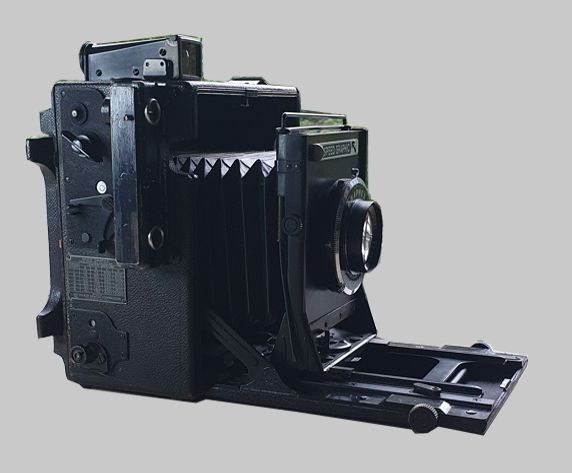
Some 25 years after the introduction of the "Top Handle Speed Graphic" and ten
years after the introduction of the
new 1928 launched "Speed Graphic", afterwards known as the "Pre-Anniversary", a new Speed Graphic was introduced as the
Miniature Speed Graphic 2 1/4 x 3 1/4
Pack or sheet film or 120 / 220 roll film size.
A similar small format was introduced almost at
the same time: the 3 1/4 x 4 1/4
First steps how to operate the
Anniversary Speed Graphic.
First of all how to open the camera.
There is a hidden knob on
top of the camera housing.
Press it down and the drop bed does what it is
suppose to do. It will drop down and you only need to give it a little push down to
get it locked in steady position.
Now you have a direct view on the f= 4,5 / 101 mm
Kodak Ektar lens which is
surrounded by the Kodak Supermatic shutter.
Shutter and lens are mounted into the square lens board which is kept by the front standard.
By squeezing both lock handles
together and drawing the lens standard against the infinity stops, the
lens will be in direct infinity position ready to take pictures of far away
objects.
However it will be clear that it takes a few more settings before you
can shoot your
first picture.
Why are there two shutters?
This camera as well as most of its family Graflex cameras are
rather unique because of the fact that they are provided with two shutters.
That
means they are accommodated with a front shutter as well as a back shutter.
The fitted front shutter and lens can be of different aperture and speed.
The
front shutter (Graphex Supermatic) mounted in the lens
standard is a common mechanical leaf shutter (built around the lens group while
the fastest shutter speed is 1/400 sec.
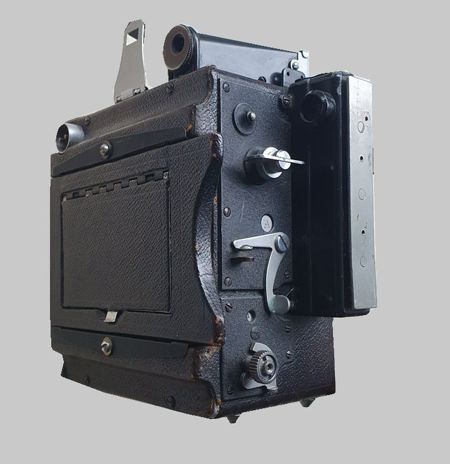
The second one is a focal plane shutter
and exists out of a "build in" large
piece of cloth accommodated with 5 slits of different length.
This special
opaque or light tight shutter
fabric is stored on the top roller while a coupled escapement assembly makes it
possible to release.
The other roller can be found on the bottom and contains a
powerful string build inside the shaft.
The spring power can be increased
by turning the centre spindle on the right bottom side of the camera with the
tension knob which can be set from 1 to 6.
When first wound the upper
roller and then released,
the spring power draws
one section of the focal plane shutter down to the lower roller.
One of the
above mentioned five slits will expose the film.
The largest one is 9,3 cm long and
significantly larger than the 5,5 cm film opening on the camera back.
This big
slit is situated almost at the top of the shutter and suitable for Time
exposures.
The next slit is 5 cm and each of the other slits are about 1/2
of the upper ones.
In combination with the tension setting of the spring in
the lower roller, 24 exposure times are available.
The fastest shutter time is
1/1000 sec, reason why these cameras are called "SPEED" Graphic.
At
that time there were no leaf shutters on the market which were as fast as 1/1000
sec.
The tag on the right side shows the several exposure times.


How to take your first picture
using the front shutter
If you want to take a photo using the front shutter, the back shutter (Focal
Plane) should be positioned on "O" (open).
Vice versa, if you want to take a photo using the back shutter, the front
shutter should be in open (T) time position.
First of all: setting the front leaf shutter
Cock the shutter of the front shutter clockwise and set the rimmed disc on
the desired exposure time and set the desired diaphragm aperture.
Secondly setting the back focal plane shutter
Set the focal plane shutter on O by triggering the
shutter until the "O" appears in the little window.
If that does not work because the shutter does not react, wind the shutter one
turn and the "O" will be visible in the window.
The shutter has now been
manoeuvred into the "zero" position in which the slit is completely open. In
this position the front shutter is enabled to expose the film.
The film in the sheet film holder or in a roll film holder is covered by a
dark slide to prevent unwanted exposure.
The dark slide has to be pulled after all settings have been made and pushed
back immediately after exposure.
----------------------------------------------------------------------
Exposures using the Focal Plane shutter.
First of all set the front shutter open.
Set the front shutter in open position by cocking the Supermatic shutter and
turning the rimmed disc with the red dot on T.
Trip the shutter and the shutter will stay in open position.
Check that!
Open the viewing
hood.
Check if shutter is in open position by aiming the camera to a well
illuminated
subject.
If both shutters are open you'll see the subject upside down on the ground glass.
Secondly set the focal plane shutter.
Now you are sure that the front shutter is in permanent open position, be aware that the focal plane shutter
is set on the desired exposure time by winding or releasing the focal plane shutter shutter until the desired figure in the window is visible.
All this can be done without plane film holder or roll film holder.
Now the camera has been prepared for the first exposure, mount the Film holder to the back of the camera.
Please realise that the film carrier is still covered by the dark slide. No light can blur your film as long as the dark slide covers the film.
Check all the settings including rangefinder distance, exposure time and the aperture.
Focus on the subject by using the focusing knobs on the front of the track .
Draw the dark slide and release the focal plane shutter release M.
After exposure push the dark-slide back into the film holder.
Remove and turn the film holder around.
Slide sheet film-holder back between ground glass holder and camera back or wind next frame on the film holder by turning the winding knob.
Wind shutter and draw dark-slide to fire the next photo.
Both front and back shutter are in closed situation now and you can wind the
roll film to the next frame.
Before removing the roll film holder or the plane film holder, always push dark
slide back to prevent blurring your last exposure.

Deutsche KurzgebrauchsanleitungAnniversary
5 ways to focus
Graflex Cameras Overview