
This page has been written using my own experiences.
The original text from the original V.N. Universal Press Camera
Van Neck London can be found on the bottom of this page.
Photos © Jo Lommen.
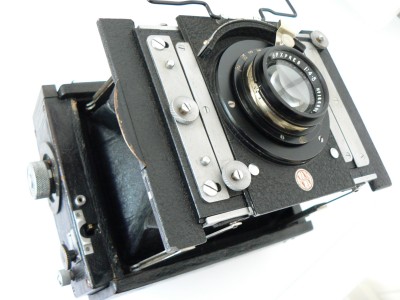
Holding this nice camera you’ll feel the absolute rigidity of the construction. The ground glass protected by the viewing hood gives a nice and sharp image of the subject. In certain circumstances when not able to use the ground glass you can rely on the distance scale in Yards, above the lens. Distance scale from 2 1/2 yard to inf. The lensboard can be moved up and down 1 cm and shift to the left and the right 1 cm. Apart from the ground glass you’ll find no other finder than a sports finder. No range finder. The lens is a Ross 6 in Press 1:4,5. Diaphragm from f 4,5 to 32. Camera weight: 2 Kg.
As the lens is a barrel lens with the lack of a leaf shutter, the camera is equiped with a focal plane shutter existing out of two blinds independently controlled by variable tape length and thus creating a variable slit between the top and the lower blind. Together with the tension loaded on the lower roller, it creates the exposure time for this type of camera. 18 possible exposure times are engraved on the table which can be found on top of the camera.
On the right side of the camera we see all the controls for setting the shutter speed of the focal plane shutter. Unlike the Graflex shutter which is equiped with fixed slits, this shutter has slits which can be set on different width by pressing inwards and turning the master winding & setting knob. This knob has a double function in which it cocks the shutter as well as it can set the width of the focal plane slit. W is the wire release- R is the release button and T is the tension knob.
WARNING
As this type of focal plane
shutter is not self-capping,
winding or setting the width of the slit should be done with closed film holder
to prevent fogging your film.
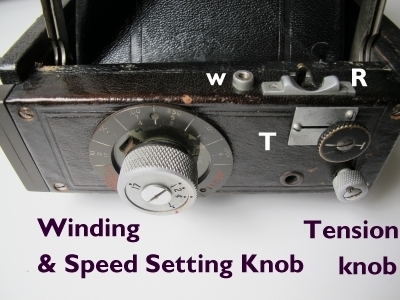
a) Winding knob cocks the
shutter and by pressing it inwards the knob controls the width of the slit.
b) T - I knob selects between Instant and Time exposures.
T
c) The finger release button R
W wire release connector
d) The tension setting knob with next to it the little window to read out the
selected tension number.
e)
Pulling out the winding knob sets the synchronising for the flash bulb.
First of
all: Never try to set or reset the slit of the shutter if the curtain is in cocked
position.
So first of all release the shutter by pressing the shutter release knob on the
front of the camera.
THE WORKING OF THE FOCAL PLANE SHUTTER.
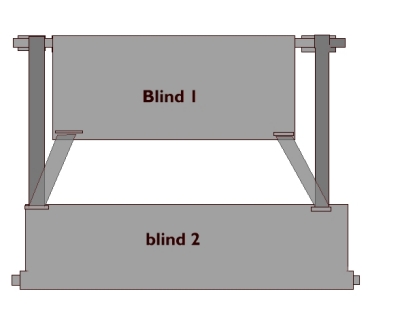
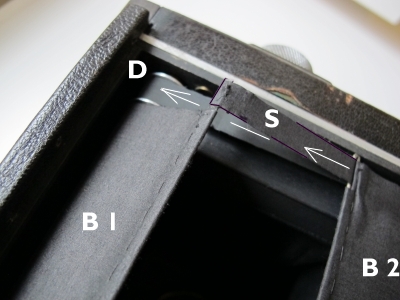
The Van Neck focal plane shutter is an ANSCHÜTZ type shutter existing out of two blinds, linked by two straps. The lower blind is mounted to the lower spring loaded tensioned roller. The top blind is mounted to the top roller. On each side of the roller there is a separate drum D. These drums are connected to the winding knob. The mechanic of the winding knob exist out of 2 toothed ratchet wheels. One for winding the drums of the S straps and the other for winding the upper blind B1. Both wheels are coupled by a pin, but will be disengaged when setting a new slit by pressing down the winding knob. When the desired slit has been set, both wheels will be engaged again whilst further winding will end up in the start position and thus ready for exposing by releasing the shutter. This non capping shutter can be used in Instant mode or in Time mode. Once the width of the slit has been set, it will stay in that position for successive exposures until it will be changed.
SETTING "I" FOR INSTANT EXPOSURE TIME
Set
black knob on “I”. Turn winding knob until upper curtain is about in the middle
of the camera back. Now press winding knob inwards and while holding inwards
turn knob clockwise till the winding knob engages with the upper gear wheel.
You'll feel the engagement and at the same time the focal plane shutter moves.
Turn the winding knob while still holding inwards
until the preferred setting is reached.
The width of the slid can be chosen – 81/2 cm - 4 cm - 2 cm - 1 cm – ½ cm – ¼
cm-
The table on top of the camera shows the corresponding exposure times in
combination with the spring tension settings.
However, to be frank, it is almost impossible to set the right exposure time
(width of the slit) by watching the figures underneath the winding knob.
Next to the figures you’ll see holes. If the chrome pin can be seen inside a
certain hole, this position indicates the width of the slit.
By removing the ground glass back you'll be able to watch the slit getting wider or narrow when turning the
setting key and measure the slit to be sure it’s the right one.
SETTING "T" MODE FOR TIME EXPOSURE
OR GROUND GLASS FOCUSSING
If you want to use the shutter in “T” mode or in open position for focusing the
subject on the ground glass, you may set the black knob next to the tension
setting knob on “T”. Then turn the
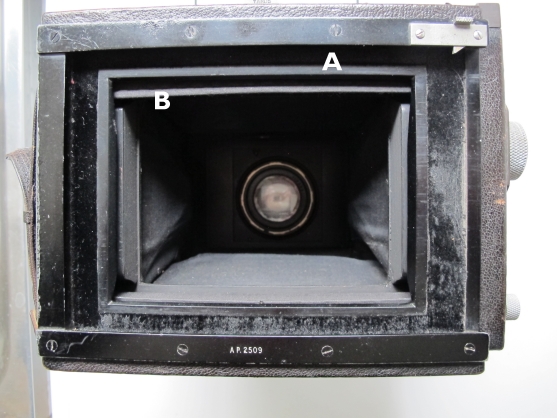
winding knob clockwise until the upper curtain almost disappears into the camera.
Note: B top of curtain should be on same level as
A, top of camera frame.
Now
press the winding knob inwards and turn it anti clockwise, the lower blind will
be pulled down until the slit is
wide open.
Release pressure of the winding
knob and the pin will re-engage.
If the pin does not re-engage turn winding knob to the right or left till you
hear and feel that it re-engages. Lastly
complete winding of the shutter. Now with selector
still on "T"
turn winding
knob clockwise until it snaps into position. Note: you may find out that winding in
“T” mode sounds and feels a bit different than in “I” mode. You wont feel nor
hear the clicking of the pawl engaging with the teeth of the ratchet wheel. This
is normal but forces you to hold the winding knob in position to prevent that
tension roller draws it back.
Release curtain
by pressing release knob to
test the good working.
Now the setting of the curtain has been completed. The slit has been set on 8 ½
cm – wide open for “Time Exposures”
To cock the shutter, turn the winding knob clockwise until it stops.
The camera is ready to shoot. Pressing the release knob brings the open curtain
into position of the camera back and stays open as long as you hold the release
knob.
Leave hold of the release knob results that the upper curtain will come down and closes
the session. To keep
the curtain in open position for ground glass focusing, you’d need to use a
wire release with “lock” function.
Turning
the tension knob anti clockwise will load the tension spring for faster exposure
times.
This setting works only in “I” mode!
If the tension has been set higher than zero, and you select “T” for time exposure, the tension spring
will jump automatically to zero and you’ll hear a nasty noise.
Winding in “I” (instant) mode, you’ll hear the clicking of the winding mechanism
all the way up. You even may leave hold of the winding knob without that it rolls
back in start position.
Peeling and Van Neck were Goerz agents, but at the time Goerz cameras were not available (due to political matters), Peeling and Van Neck were prepared to produce them themselves. Early examples were called the "British Anschutz", paying homage to the designer of the Goerz shutter, Ottomar Anschutz. Later production items, like this one, were called the V-N Press.
During the interwar period the collapsible cameras from Zeiss( Palmos), Goerz (Anschütz), A.P.M. (Apem*) and Van Neck amongst many others, generally called press cameras, were extensively used throughout Fleet Street, the home of the British press. Peeling and Van Neck occupied an influential prostitution acting as the English agents for Goerz and when war stopped supplies, they launched their own British Anschütz camera in 1919 until 1924 when the Goerz became available again.
The original manual gives all the information one needs to start using the Van Neck Press camera. Apparently presuming that professional photographers need no more information than how to open and close the camera, how to set the aperture and how to synchronize the flash. Unfortunately, no more instructions can be found. Without reading this little manual it could be very hard to find out, how to alter the slit aperture.
Original Text V.N. Van Neck Universal Press Camera.
INSTRUCTION FOR USE
The efficiency and life of the camera is greatly increased by careful and considerate handling, and it is your own interest to follow the hints given below.
TO OPEN THE CAMERA.
Take hold of the front by the metal finger piece attached to one end and pull it half-way. Then pull the other end out half-way and than the first end, completing the opening by pulling out the second end. The same procedure should be adopted in closing, i.e. close one end down only half-way, by pressure on the centre of struts, then the other end instead of closing one end first. By this method strain on the studs is obviated thus increasing their life.
TO OPERATE THE SHUTTER.
To read the width of the slit in the shutter blind it is
necessary to look through the circular window beneath the winding knob where the
c.m. apertures are engraved on the main gear wheel.
The holes on the outer edge of this gear wheel are opposite to and correspond
with the engraved apertures, and a pin on the lower gear wheel engages in the
one desired.
The alteration of the slit aperture for different speeds is as follows:
Wind the shutter blind maintaining a slight inward pressure on the winding knob,
and as the edge of the top blind nears the top of the opening in back frame the
pin on the lower gear wheel will disengage, then whilst still maintaining light
pressure on the winding knob set slit to the required aperture. Release pressure
and the pin will re-engage. Lastly complete winding of the shutter.
The tension is controlled by the small knob at the bottom of the mechanism
cover, the numbers being visible in the small aperture above. This knob is
turned anti-clockwise to increase tension, but to release tension, this knob
must not be turned by hand, only by turning the T & I knob to T.
TIME EXPOSURES.
Set the T & I knob to T, open the shutter blind to its fullest
aperture, then wind up the shutter as far as it will go. Whilst pressure is
maintained on the finger release the shutter will remain open, closing when the
pressure is taken off.
THE CABLE RELEASE can be employed, if preferred, for releasing the shutter. This
screws into the small nozzle on the front edge of the mechanism cover.
SYNCHRONISED FOCAL PLANE SHUTTER.
The method for setting the electrical contact for the desired speed is as
follows:
On the black ring surrounding the winding knob of the shutter figures are
engraved corresponding with the first, third and fourth columns of the exposure
chart given below.
First set the aperture of the shutter blind and the tension to the speed desired, then lightly pull outwards the winding knob of the shutter at the same time turning until the correct number given in column four is against the small black dot on the outer edge.
The switch of the battery box must be set at off until the shutter is wound up and it is advisable to switch on only just before the exposure is made.
Chart for using the Synchronised shutter with LARGE LONG FLASH SASHALITE* BULBS.
| Speed | Slit | Tension | Reading winding knob |
| 1/1000 | 1/4 | 9 | 1 |
| 1/500 | 1/2 | 9 | 1 |
| 1/25 | 1 | 9 | 2 |
| 1/100 | 2 | 7 | 4 |
| 1/50 | 4 | 5 | 7 |
| 1/10 | 8 1/2 | 0 | 17 |
WHEN THE CAMERA IS NOT IN USE
The winding knob should be protected from pressure.
The case for carrying should have resting blocks so arranged that the camera is not resting on the winding knob, also release both the shutter and the tension spring.
*)Jo
Lommen - Compatible to
Sylvania 2A FP (Focal Plane) E27 screw.
GE No.31 or Philips PF45
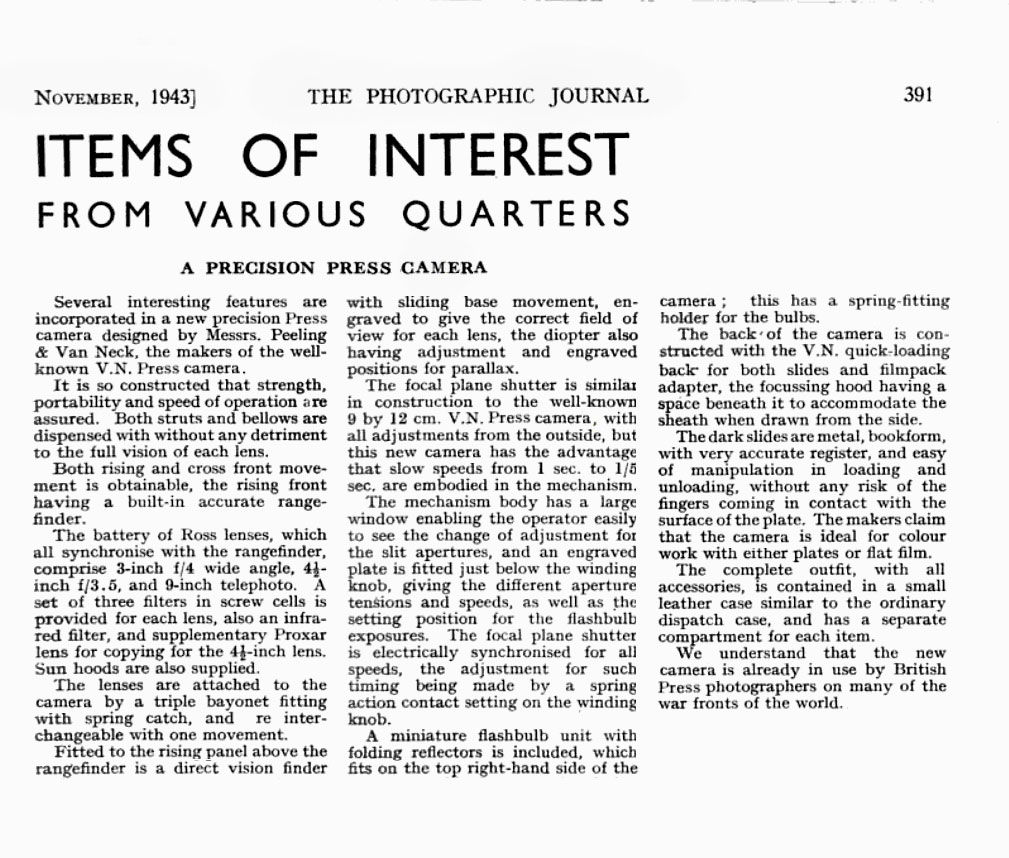
The Photographic Journal November 1943
covers the release of the new Van Neck precision camera
Helmut Schug
More about the Van Neck camera
*) Amalgamated Photographic Manufactures Ltd formed in 1921 from an assortment of British photographic companies. Soho, Kershaw, Rajar and many others including Paget (Rajar Films who were eventually taken over by Ilford). APeM (the trade name) was not sucessful and closed in 1929. (Roger Provins) Kershaw-Soho (Sales) Ltd. was a camera maker based in Leeds. It was separated from APeM in 1928 and became part of the J. Arthur Rank Organisation.