
Graflex Reflex Cameras
Broken Strap Nightmare.
by Jo Lommen
Almost every vintage Graflex reflex camera shows some signs of wear due to its
age,
but a
broken or missing hand strap is the most eye catching shortcoming
and reduces the value of your camera dramatically.
Repair is the only option to bring the cosmetic appearance in optima forma
again.
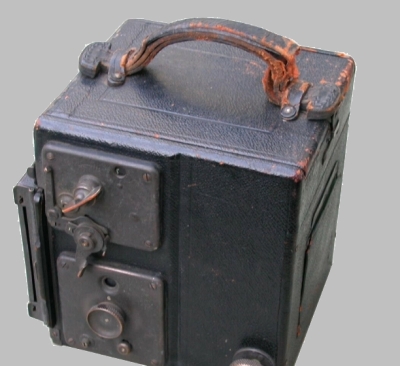
The photos below were copied from eBay listings and show how poor these
cameras were offered for sale.


Replace
Broken Carrying Straps
and increase the value of your camera.
Looking for a nice and usable classic camera such as a
Graflex Series B or Series D or Super D or the 1912-1927 Top Handle Speed
Graphic or perhaps an Auto Graflex or a Graflex Home Camera? All these cameras
are reflex cameras designed and manufactured far before World War II. All
these Graflex cameras were remarkable well made wooden cameras equipped with
the famous 5 slit focal plane shutter. The mirror box serves as a light
lock to allow winding the shutter with pulled dark slide without fogging the
film. All of them are equipped with a nice hinged solid top cover attached with a
coupled viewing hood. In closed and locked position the top cover serves as carrying assembly for the
relatively heavy
camera. In open position it serves as a support for the collapsible viewing hood when erected for
easy focusing.
We all know the disappointment seeing one of these cameras
passing by on eBay or else where on the www. Sometimes the scuffed leatherette
and very often a missing a hand strap keeps us away from buying such an
interesting classic camera. While the leatherette can be upgraded by a good
treatment with leather wax, missing leather brackets and or a broken strap
cannot be replaced by a piece of rope or a worn leather waist belt. In other
words it would be cosmetically almost unacceptable to display such a camera in your collection or
worse to take the camera out for a photographic job.
Broken brackets or strap would make it
even impossible to carry the camera around.
Some of these camera types were originally equipped with metal brackets and some
of them with leather
ones. Both were attached to the camera top cover by rivets. I'll try to
motivate you to exchange the broken parts for new ones in order to have more
fun with these beautiful and precious still useable classic cameras. Before
get started it is recommendable to read the below advices to prevent heavy
disappointments. The work is not difficult, but needs concentration and some
knowledge about wood and metal working and beside that two right hands.
Remove the old brackets from the top cover.
To replace new brackets the old brackets have to be removed, which is
a bit more complicated than imagined. As said before these brackets are
mounted with rivets. These rivets should be removed on a special way to
prevent breaking the wooden top cover of your precious camera. There are
rivet removal tools on the market
which makes such work very easy, but the danger of breaking your wooden camera
top-cover is not unthinkable. Reason why my recommendation is to
do it on my way. There are plenty websites showing "how to remove rivets...", but
this one here is
especially published for use with the Graflex Reflex Cameras' Top Cover. The
Top Cover is a hinged wooden plank on top of the camera. It covers the ground
glass and the folded viewing hood. The top cover when opened, is supported by two centre pivot hinges
holding the top cover strait up for focussing. In closed
position the cover is locked by a snap lock on the top centre front site. When
locked, the cover serves as a carrying support.
Essential are the straps, brackets and rivets you must relay on when
carrying the camera. Let's
start with the leather strap. This strap is made out of 2 layers of saddle
leather and stitched using the two needles stitching method. Brackets can be
made of metal or leather and should fit very well to get the best possible
hold. Cosmetically or better to say historically preferable the brackets should be fastened to the wooden top cover by rivets.
Second choice would be using bold woodscrews. Here below
you'll find some practical details how to do the work, a work which upgrades your camera so
much.


On the left the camera "as is ".
After peeling off the old scuffed leather shows itself cleaner and nice to
see. Recover with leather is a personal choice. Both options are welcome.
The undressed camera gives us a better view on how to place the new strap
handle.
Put on safety glasses to protect your eyes.
1) To work on the top cover it is necessary to remove the leather covering and
to unscrew the brass hinge.
The photo above shows the brass hinge. Unscrew the
cover-screws.
2) place the top cover on a good solid place to work on.
3) Use a punch to put a divot in the head of the rivet after having filed the round top
of the rivet nicely flat. Ready for drilling.
4) Drill with a fitting bit which is not bigger than the rivet pin. Drill
carefully. Don't press the drill too much. Use a bit of grease or oil.
5) Once the rivet turns freely around you can stop drilling and get the rivet
out of the hole.
6) Continue with the 5 other rivets and clean the holes.
Placing the new brackets.
1) Put a pair of rivets with the flat rivet cap downwards into the cover holes on the
back side and hold them in place.
2) Now check if the pins of the rivets match with the holes of the new
bracket.
3) Place new strap holder between both pins and lay the bracket above the two
pins. Place washers and press them as far as possible down.
Check if the strap lays in proper position between both rivet
pins. Now with the special tool
3) If so, place the bracket on the rivet pins and place the washer onto the
pin. Press washer by hand as low as possible.
3) Lay camera cover with the top rivet on a riveting block steel. Use a rubber
underlay to absolve the hammer blows.
4)
UNDER CONSTRUCTION
Unfortunately these rivets are very hard to find and difficult to mount, reason why I prefer the leather loops and steel brackets to be mounted by using nice looking screws. They very closely resemble the original appearance. The new replacement hand strap should be reliable, and made out of two layers of saddle leather which should be nicely stitched together like the original one. Only when made like this, it would be a guarantee to hold for many more decades. Each camera size whether it is a 3 1/4 x 4 1/4 inch or the larger formats 4x5 inch and 5 x 7 inch, has it own type of strap, differing in size and shape.
New Personalised Hand Strap
 Making such a new strap demands
using the right skills and knowledge of the leather
material and the art of stitching.
This, plus the maker's knowledge of all the
different Graflex camera types will guarantee the right choice if you would
intend to restore your camera. During the corona lockdown I managed to learn
working with hand stitching leather techniques which ended up in very nice
results.
Experiments with
different leather qualities, the use of several needles and threads produced the best fitting
and nearly original hand strap for your camera.
If you would be interested in such a strap, please let me know your camera type and size.
Photos of your camera would be more than welcome to give me the right
information about camera type and condition.
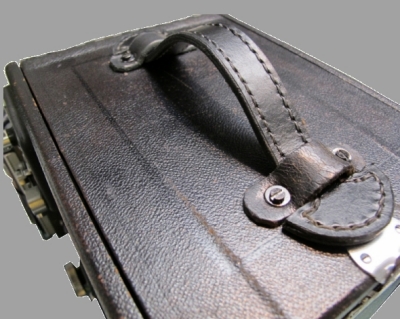
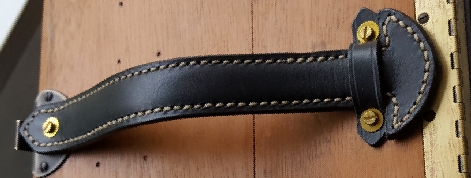
On the left a 4x5 Series D equipped with my new hand strap. The strap has been
made using the two needle stitching
method. See photo on the right side. The 2 needle stitching is much more reliable than the single needle stitch and looks
much better.
Even the colour of the stitched thread can be chosen: White or black.
Below a 5x7 inch Graflex Home Camera.
Note the odd front attachment of this strap handle which
differs from the usual brackets support.
Special handcrafted from the original hand strap of the 5x7 inch Auto Graflex.


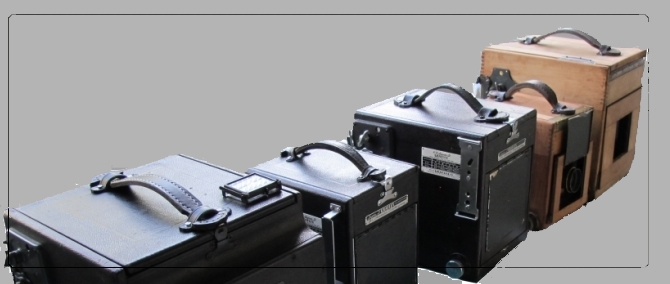
Next photos show you different strap holders and some of my cameras
equipped with new original, handsome and reliable leather carrying straps.
Carrying straps can be mounted to the camera using screws or rivets.
If you would be interested in such a new hand made personalised strap
holder, please contact me by using my e-mail address email