
Photo © Jo Lommen
First of all...open camera front before trying any settings.
You cannot set or wind the tension
before the front cover has been opened and
the lens has been pulled out of the camera housing.
How to start.
Exploring the 1-A
That means that there are less exposures possible and the counter on the back of
the film is not correct or even
invisible in the ruby window on the back of the camera..
To open the focusing hood, release catch
C op top of
the camera next to the carrying strap. Once released, raise the cover which
automatically gives access to the top of the focusing hood. Straiten the two arms
and tilt the leather top up as far as it goes which will draw
the focusing hood taut and will hold it in vertical position by the build in
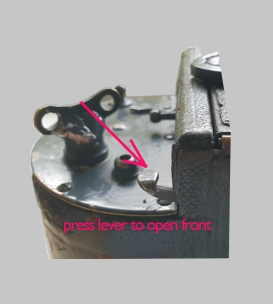
catch which is situated on the inside back of the housing. Next open the front
of the camera by pressing the lever X on right upper forward corner. Press down
the drop bed with your two thumps. The click tells you that the bed is now in
position. Draw out the lens standard by squeezing the two handles together and
at pull the lens standard until this movement will be stopped by the infinity
stops on the track. Now fine focus can be done by using the ground glass while
turning the focusing knob on the front of the bed. Try this out several times
until you can do it almost automatically. To practice the next step, loading of
the camera with film, you better close the camera again. First unlock the focusing
hood, guide it down into its fold position and close the cover.
(IMPORTANT) Push lever H
forward as far as it will go before pushing the front lens standard back into
the camera housing. Next push down both front side arms and swing the bed
upwards into locking position. Now your camera is ready to be loaded with film.

On the back side of the camera press both spring catches C at the same time and
remove the cover from the camera
housing.
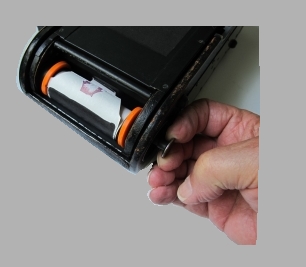
Originally the camera was designed for # 116 film (4½ x 2 inch exposure window)
To use modern 120 roll film you would need two adaptors. Available on the ( WWW
#116 - 120 film adapter 3 D)
These orange adapters both fit
on one end to the film spool and the other into the camera winding spool
centre.
Once the new unexposed film spool including its two adapters has been placed you
may unroll the paper cover film and
draw out the lower, left spool centre on the bottom and turn it slightly to the right which locks
then in an extended position, permitting the roll of film to be placed in the pocket.
Once the roll film is in position you may turn the spool to the left to lock its
position again.
A slight turn to the left allows the spring actuated spool centre to spring back
into place engaging the film spool.
Now break the paper seal on the roll film and draw the paper across the exposure
window and thread into the sleeve slot in the empty winding spool.
A few turns of the winding key will help to securely bind the paper to the
empty winding spool. Replace the camera back with the top side up and the ruby
window on the left in such away that the spring catches pressed into locking
position. Turn the winding key to the right until the arrow disappears at the
ruby window which indicates that the position of film for the first exposure has
been pulled in position. Immediately after each exposure the next exposure
should be prepared. However the photo below shows the real distance needed to
bring the film in the next possible exposure position to correspond with the
width of the exposure window. The numbers appearing at the ruby window are
not corresponding to the real film exposure.
Unfortunately double exposure and image overlay could be the consequence.
You may consider creating your own cover film paper for the 4½ x 2 inch roll
film.


The Graflex 1 A Controls
Left side control panel.

Regulating the Shutter.
B=winding key to set tension on the focal plane shutter speed. Turn key
in arrow direction. Tension can be read out in window G
To release the curtain tension step by step, move lever
P back and forth
until the proper tension is visible in window G
Speed setting numbers run from 1 to 6. The highest speed is indication 6.
Right side control panel.
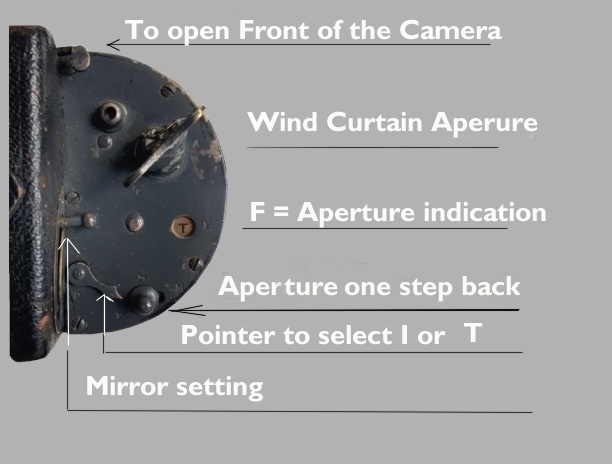
The Graflex 1 A controls seen from the back side. On the right side.
Lever X Press down to unlock front of the camera.
Press drop bed down till it clicks in position.
Set the mirror in focussing position by pressing forward lever
H until it catches. at the same time set pointer
D at Instant.
A = winding key to set focal plane shutter aperture
slit. Beside T and O setting all variable slit apertures width are visible in window F
Closing the Camera
When closing the camera push the lever
H forward as far as it will go. Squeeze both thumb
handles on the front standard together and push the front lens standard back
into the camera housing.
Press down on both side arms and swing the drop bed upwards into locking
position.
Next option go back to...
Graflex 1 A Previous page
Jo Lommen
Technical pages
Graflex Cameras
