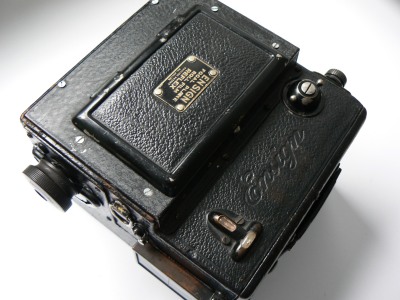
The Ensign
Focal Plane
Roll Film
Reflex camera
More than 90
years after it's production, I purchased this Ensign Reflex on a fair in Houten
Holland.
At the first glance, it was worth the price I paid for it. But a closer
look showed some major problems.
To achieve my goal to take pictures with the oldie some day, I'd have to
solve the problems by repairing.
There is a missing viewing hood and there are shutter and mirror setting
problems.
The Ensign Roll Film Camera.
In the mid 1920's, the Houghton-Butcher Manufacturing Company Ltd.
Clifford Road - Walthamstow, London E.17,
produced this interesting designed
Ensign roll film reflex camera equiped with a focal plane shutter.
Broadly, the camera compromises two principal parts namely a lower part and a
top case
which is either detachable from the body or according to the later
feature of the new innovation, hinged.
An older design lacks the focal plane shutter. Instead it has a front shutter.
Both designs 13x14x11 cm look like an ordinary compact roll film box camera.
Even the lens is
placed inside the box and hidden with a hinged cover. For it's time
a rather compact camera.
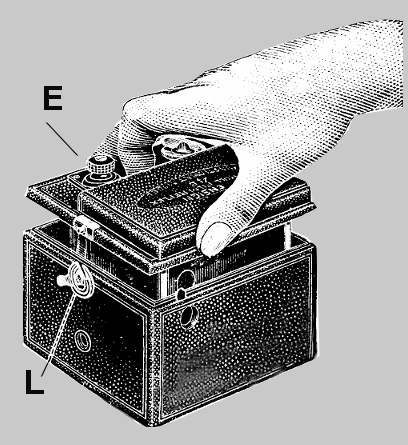
The first one, the "All
Distance Camera" roll film camera existed out of two separate parts where L on both sides are the
locks and E is the focussing knob which should be turned
until the lens is withdrawn inside the camera, making it possible to lift the top
portion out of the lower camera body. The other knob on top is the film winder
key.
The distance should be set by a special distance setting lever. Just out of
three distances could be chosen off.
The Ensign Speed Roll Film Reflex Camera.
For better understanding we
concentrate on the latest type, the Ensign Speed Roll Film Reflex Focal Plane Shutter Camera. The
already mentioned two
parts of the camera body are now hinged
together along the rear wall,
which could be
opened like a book giving easy access for loading the roll film.
There is a coupled focusing knob on the right side, effected by means of a worm
and wheel moving the lens for and back while the image is projected
by the view finding mirror on the ground glass. Further more there is a viewing
hood on top of the camera above the ground glass,
making it possible to focus without the interference of incoming light. The
viewing hood pops up automatically if the top cover is opened by pressing the
nickel knob.
Even a Tele-objective
was available, so the conclusion is that we're not dealing with an another cheap roll film box-type
camera,
but an almost sophisticated reflex camera for the enthusiastic photo
amateur.
What's makes the different with a cheap box camera?
1) Reflex. Full size view. What you see is what you get. All be it reverse left to right !
2) Focal plane shutter. Fast shutter-times up to 1/500 sec.
2) Quick film advancing. 6x9 cm on 120 Roll Film.
3) Security. No heavy breakable glass-plates.
4) Extra Newton direct vision (sport) finder.
5) Compact, solid, reliable housing.
6) retraction of film pressure plate when red window cover is raised.
The Outside.
The reflex works by a mirror looking
through the Aldis-Butcher Anastigmat - f 4,5 - 4 inch - into the world outside and projects its image on the ground-glass on top of the camera.
The viewing hood (mine was missing) permits a
good view at the ground glass, which can be dark or light, depending on
the diaphragm setting from 4,5 to 32.
Some sacrifices were made to miniaturize the camera: the position of the diaphragm setting on the lens
nor the position of the film advance knob is very ergonomic.
The 120 Roll film is a big advantage
compared to heavy and breakable glass-plates which were usual that time.
Glass-plates and sheet film holders handling is quite complicating and demands a
lot of skill as the photographer should not forget to open the dark-slide before
exposing and to slide it back again after each exposure.
On the other hand, the
roll-film was generally not used by the press, as newspaper darkrooms preferred to develop
each shot separately
to give optimum quality negatives for half tone block
making.
As advancing the film and cocking the shutter, are not synchronized, it's
obvious that even this reflex roll-film camera is not a guarantee against blanks
or double exposures.
In certain circumstances a reflex camera could be a bit inconvenient in use
reason why
a Newton finder could be ordered as an extra option.
A look inside.
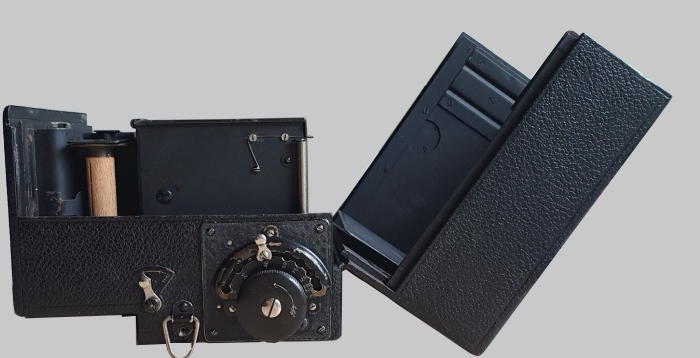
To open the camera, push the lock on the bottom of the camera.
The hinged lower body
opens and shows the inner side of the Ensign Reflex.
The 6x9 cm roll film
allowed the designer to make a compact housing, as the spools of the film find a
place, left and right, next to the built-in lens, in front of the camera.
In
this front, a build-in mechanism, controlled by the knob on the left side of the
camera, moves the lens, located in a lens-box, in order to adjust the distance to
the object.
Pushing the exposure knob, raises the mirror against its spring pressure. The
focal plane shutter start to travel along the film and thus making the exposure.
The mirror returns when the finger pressure is removed.
To prohibit light coming
into the exposure chamber, the mirror including its hinged frame frame covers
the complete exposure chamber if not raised by hand
On the right side of the lens-box, the unexposed spool
finds its place.
The film runs around the mirror-box to the winding spool on the
left side of the lens-box.
On the back of the mirror-box, you can find the 6x9
cm focal plane shutter opening.
The bottom of the mirror-case can easily be
opened by sliding the bottom-plate off.
It allows one to check the movements of
the lower blinds or to check or adjust minor mirror problems.
Until so far the
legitimate access to the inner of the camera.
Discovery.
But there is more to discover and therefore we tackle the viewing-hood-case by
unscrewing the 6 screws on top of it, but leave the two on the right and the two
on the left from the hinged door untouched.
The view-hood-case comes off easily
and now it's obvious why we did not unscrew the four screws on top.
The leather
viewing hood is attached to the case and if it is not necessary to repair it, we
leave it as it is.
After removing the view-hood-case, we see the ground glass
hold by two stripes of metal.
Four more screws further and we're looking on, or
maybe into the mirror.
No need to say: "Do not touch the surface of the
mirror", but if necessary, clean the dirty mirror, very careful, with
a soft paint brush.
On the rear you can study the movements of the upper blind,
by turning the shutter-cocking-knob.
Don't unscrew the cocking-knob without
making a mark of it's position.
This is essential for the correct
shutter-time.
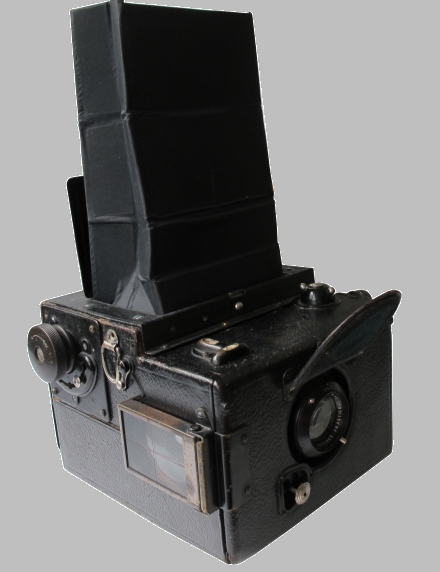
It took a while, but
finally I had some spare time to reconstruct the missing viewing hood.
How to build
a viewing hood and or bellows
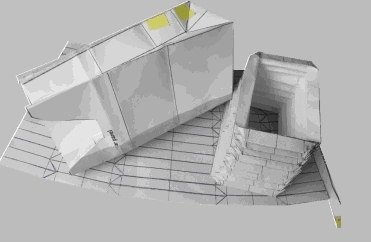
Design and pre-production process results in a paper model, ready to be used for a try out into your camera.
to be continued...